
Your basement floor takes a beating every single day. Moisture seeps up from below. Heavy foot traffic wears it down. Stored items scratch the surface. Over time, that bare concrete starts to crack, stain, and crumble and before you know it, you have a real problem on your hands.

The good news? There are better options today than ever before. Modern coatings have completely changed the game. Homeowners in Woodland Park, NJ and across the region are protecting their basement floors with solutions that last decades, not just a few years.
This guide walks you through everything you need to know. We cover the main coating types, how to prepare your floor, what to expect from installation, and how to maintain your investment. Whether you’re a homeowner doing research or a contractor looking for technical depth, there’s something here for you.
One of the most popular choices right now is polyaspartic floor coating. It cures fast, holds up incredibly well, and looks great. We’ll break it down in detail a little further on. But first, let’s talk about what’s actually happening with your concrete floor.
Why Your Basement Floor Needs Protection
Concrete is strong. But it’s also porous. That means water, oil, and chemicals soak right in. Without a proper coating, your basement floor absorbs moisture constantly. That leads to mold, mildew, and structural damage over time.
In places like Woodland Park, NJ, the climate swings dramatically between seasons. Wet winters and humid summers put real stress on unprotected concrete. A quality coating acts as a barrier. It keeps moisture out and keeps your floor looking clean.
Beyond moisture, think about day-to-day use. Garages, workshops, and storage areas create heavy wear. Bare concrete dusts and degrades under that kind of pressure. A coating seals the surface and makes it easier to clean.
Protecting your floor is also a smart financial move. A coated basement floor can increase your home’s value. It signals to buyers that the space is well-maintained and finished.
What This Guide Covers
This guide is designed to be practical. We’re not going to overwhelm you with jargon. Instead, you’ll get clear explanations, honest comparisons, and real tips you can actually use.
We cover six major coating types. We explain surface preparation step by step. We compare performance, cost, and maintenance. And we close with a FAQ section that answers the questions we hear most often.
Understanding Concrete Basement Floors
How Concrete Actually Behaves
Concrete looks solid. But under a microscope, it’s full of tiny capillaries and pores. Those gaps let water migrate through especially in below-grade spaces like basements. That migration is called hydrostatic pressure, and it’s one of the most common causes of coating failure.
Temperature changes cause concrete to expand and contract. Over years, that movement creates hairline cracks. Those cracks let in even more moisture. It’s a slow cycle, but it adds up.
Understanding this helps you choose the right coating. Some coatings are rigid. Others are flexible. The right choice depends on your specific slab condition.
Common Problems You’ll Find in Basement Floors
Here are the issues most homeowners deal with before they coat their floors:
- Cracks and spalling — surface breakage from freeze-thaw cycles or heavy loads
- Efflorescence — white, chalky deposits left behind when water evaporates through concrete
- Oil and chemical stains — common in garages and workshops
- Moisture vapor — invisible moisture rising from the slab
Each of these requires a specific prep approach before any coating goes down. Skipping prep is the number one reason coatings fail. Don’t rush this step.
What Makes Basement Concrete Different
Basement slabs are different from garage or warehouse floors. They sit below grade, which means soil moisture is always nearby. They often have less airflow. And they may have been poured decades ago, which means the concrete surface has changed over time.
That context matters when picking a product. A coating that works perfectly on a dry garage floor may bubble or peel on a damp basement slab. Always test for moisture before you coat.
Practical tip: Use a simple plastic sheet test. Tape a 24-inch square of plastic to your floor and leave it for 24 hours. If you see condensation underneath, you have moisture issues that need to be addressed first.
Types of Modern Protective Coatings
Epoxy Coatings
Epoxy is the most widely recognized concrete coating. It creates a hard, chemical-resistant surface that bonds tightly to concrete. Two-part epoxy systems — resin plus hardener — react together to form a durable film.
There are different types. Water-based epoxy is easier to apply and has lower fumes. Solvent-based epoxy is tougher but requires more ventilation. 100% solid epoxy contains no water or solvents at all — it’s the most durable option.
For basement epoxy floor coating, 100% solid or water-based formulations are typically the best fit. They handle moisture vapor better than solvent-based products. They also resist the moderate foot traffic common in residential basements.
Practical tip: Apply epoxy only when the concrete temperature is between 55°F and 90°F. Too cold and it won’t cure properly. Too hot and it cures too fast, trapping air bubbles.
One important limitation: standard epoxy yellows under UV light. That’s not an issue in a basement with no natural light. But if your basement has windows, consider a UV-stable topcoat.
Homeowners searching for basement epoxy floor coating options should know that most professional systems include a primer coat, a body coat, and a clear topcoat. That three-layer system delivers far better results than a single-coat DIY kit.
Polyurethane Coatings
Polyurethane is often used as a topcoat over epoxy. It adds UV resistance and a bit of flexibility. That flexibility matters in environments where temperature swings are common.
There are two main types. Aliphatic polyurethane is UV-stable and works well where light exposure is a factor. Aromatic polyurethane is less expensive but will yellow over time.
Polyurethane alone doesn’t bond as well to bare concrete as epoxy does. That’s why most professional systems use epoxy as the base and polyurethane as the finish layer.
Polyaspartic Coatings
This is where things get really interesting. Polyaspartic technology has changed what’s possible in concrete floor coating.
What makes it different? Polyaspartic floor coating cures dramatically faster than epoxy. Most systems are fully cured within 24 hours. Some fast-cure formulas are ready for light foot traffic in as little as 4–6 hours.
That speed is a big deal. It means less downtime. A professional crew can coat your basement floor and have you walking on it the same day.
Polyaspartic floor coating also handles temperature extremes better than epoxy. It can be applied in temperatures as low as -20°F and as high as 110°F. That’s a huge advantage in climates like Woodland Park, NJ, where seasonal swings are significant.
The coating is UV-stable, which means it won’t yellow over time. It’s also highly resistant to abrasion, chemicals, and impact. In long-term performance tests, polyaspartic systems consistently outperform standard epoxy.
One trade-off: polyaspartic reacts fast, which means application windows are short. You need to work quickly. This is usually why homeowners hire professionals for polyaspartic installations rather than doing it themselves.
Practical tip: If you want the speed and durability of polyaspartic but worry about DIY application, ask your contractor about hybrid systems. A polyaspartic topcoat over an epoxy base gives you the best of both worlds.
Acrylic Sealers
Acrylic sealers are the most budget-friendly option. They’re easy to apply and can be recoated without much prep. They come in water-based and solvent-based versions.
The downside is durability. Acrylic sealers wear faster than epoxy or polyaspartic systems. They’re a good choice for light-use storage areas. They’re not the right call for high-traffic spaces or areas with heavy moisture.
Penetrating acrylics soak into the concrete and protect from within. Film-forming acrylics sit on top and create a visible sheen. Penetrating types are better for damp basement conditions.
Cementitious Waterproofing Coatings
These coatings are cement-based, which means they bond naturally with concrete. They’re designed specifically for waterproofing, not decoration. Crystalline waterproofing coatings are the most advanced type; they actually grow crystals inside the concrete pores to block water.
For severe moisture problems, a cementitious waterproofing layer applied before your decorative coating can make a huge difference. It addresses the moisture issue at the structural level, not just at the surface.
Hybrid and Multi-Coat Systems
The most durable basement floor systems combine multiple products. A common setup:
- Moisture-tolerant epoxy primer
- 100% solid epoxy body coat with decorative flakes
- Polyaspartic or polyurethane clear topcoat
Each layer adds something different. The primer addresses moisture and improves adhesion. The body coat adds build and aesthetics. The topcoat adds UV resistance, abrasion resistance, and cleanability.
This is the standard for professional installations in Woodland Park, NJ and surrounding areas. It costs more upfront but delivers the longest service life.
Surface Preparation
Why Prep Matters More Than the Coating Itself
Here’s a fact that surprises a lot of homeowners: the coating itself is only about 20% of the job. The other 80% is preparation. Get prep right and almost any quality coating will perform well. Skip prep and even the best product will fail.
Surface prep ensures the coating bonds to the concrete rather than to dust, oil, or moisture sitting on the surface.
Testing Before You Start
Before any work begins, test your floor.
- Moisture vapor emission rate (MVER) test — measures how much moisture vapor is rising through the slab. High MVER means you need a moisture-tolerant primer.
- pH test — high alkalinity on the surface can prevent adhesion.
- Pull-off test — measures the tensile strength of the surface layer. Weak concrete won’t hold a coating.
These tests take less than an hour. They can save you thousands of dollars in failed coatings.
Mechanical Preparation
For most basement floors, mechanical prep is the gold standard.
Diamond grinding uses industrial grinders with diamond-tipped pads. It removes surface contamination, opens up the pores of the concrete, and creates a consistent profile for the coating to bond to. It’s the most commonly recommended method for residential basements.
Shot blasting propels tiny steel beads at the surface at high speed. It’s more aggressive than grinding and is usually reserved for industrial applications. It can be overkill for a typical basement floor.
Scarifying cuts grooves into the surface. It’s used when you need a serious mechanical profile on very smooth or contaminated concrete.
Practical tip: After grinding, vacuum the entire floor thoroughly. Then wipe it down with a clean, dry cloth. Even a thin layer of dust will compromise adhesion.
Chemical Preparation
Acid etching is a traditional method. Muriatic or phosphoric acid is applied to the floor, left to react, then rinsed off thoroughly. It opens up the concrete surface and removes light contamination.
The downside: if your floor has moisture issues, acid etching can make them worse. And if the rinse water isn’t removed completely, residual acid can interfere with coating adhesion.
Most professional contractors have moved away from acid etching in favor of mechanical prep. It’s messier, less consistent, and harder to control.
Repairing Cracks and Defects
All cracks should be addressed before coating. Here’s what to use:
- Hairline cracks — fill with epoxy crack filler or polyurea joint filler
- Structural cracks — may need epoxy injection under pressure
- Spalled areas — fill with a fast-setting cementitious repair mortar
- Low spots — use a self-leveling epoxy or cementitious underlayment
Never coat over unfilled cracks. They’ll telegraph through the coating and eventually cause it to crack too.
Application Techniques and Best Practices
Getting Conditions Right
Temperature and humidity are critical during application. Most coatings need the substrate temperature to be at least 5°F above the dew point. If it’s not, you risk moisture condensing on the surface during application which causes adhesion failure.
In Woodland Park, NJ, late spring and early fall are the best times to coat basement floors. Summer humidity can be challenging. Winter temperatures can slow curing significantly.
Practical tip: Run a dehumidifier in your basement for 24–48 hours before application. This removes ambient moisture and gives your coating the best possible start.
Applying the Primer
The primer is your foundation. Don’t skip it. Moisture-tolerant epoxy primers are specifically designed for below-grade slabs. They penetrate deep into the concrete and create a stable base for the coats above.
Apply primer with a 3/8-inch nap roller. Work in sections. Avoid leaving puddles or thick edges. The goal is a thin, even film that penetrates the slab.
Let the primer cure to a “tacky” feel before applying your next coat. Timing varies by product — usually 4–12 hours.
Applying the Body Coat
The body coat is where you build thickness and add decorative elements. Roll it out evenly, working from the back of the room toward the exit. Avoid stepping on freshly applied material.
If you’re adding decorative flakes or chips, broadcast them into the wet coat immediately after rolling. Work in sections so the material stays wet long enough to accept the flakes.
After the body coat cures, scrape off any loose flakes with a floor scraper. Then vacuum and lightly sand before applying the topcoat. This step is easy to skip — don’t.
Applying the Topcoat
The topcoat seals everything in. It determines the final sheen and the long-term cleanability of the floor.
Apply with a new roller cover for the cleanest finish. Work quickly and evenly. Most topcoats have a limited working time especially polyaspartic products, which can start to set within 20–30 minutes of mixing.
Avoid applying topcoats in direct sunlight or extremely warm conditions. The fast cure is an advantage in many situations, but it can work against you if you’re not prepared.
Curing and Timing
| Coating Type | Light Foot Traffic | Full Cure |
| Water-based epoxy | 12–24 hours | 7 days |
| 100% solid epoxy | 24–36 hours | 7 days |
| Polyaspartic | 4–6 hours | 24 hours |
| Polyurethane topcoat | 12–24 hours | 5–7 days |
| Acrylic sealer | 2–4 hours | 24–48 hours |
Give your floor the full cure time before placing heavy items or furniture.
Performance Characteristics and Comparison
How Do the Main Coatings Stack Up?
Here’s an honest comparison across the factors that matter most:
| Coating | Moisture Resistance | Abrasion | UV Stability | Cure Speed | Lifespan |
| 100% Solid Epoxy | High | High | Low | Slow | 10–15 yrs |
| Polyaspartic | Very High | Very High | High | Very Fast | 15–20 yrs |
| Polyurethane | Moderate | High | High | Moderate | 8–12 yrs |
| Acrylic Sealer | Low–Moderate | Low | Moderate | Fast | 2–5 yrs |
| Cementitious | Very High | Moderate | N/A | N/A | Decades |
For most Woodland Park, NJ homeowners looking for the best all-around performance, a hybrid system — epoxy base with polyaspartic topcoat — delivers the best results.
Slip Resistance
Slip resistance is critical in basements where moisture is present. Smooth coatings can become dangerously slick when wet.
Most professional installers add non-slip aggregate fine aluminum oxide or silica sand to the topcoat. This adds texture without significantly changing the appearance. Always ask about slip resistance when specifying a coating system.
Aesthetic Considerations and Design Options
Making Your Basement Floor Look Great
Gone are the days when basement floors had to look industrial or plain. Today’s coating systems offer a wide range of visual options.
Solid colors give a clean, uniform look. Neutral grays and tans are the most popular in residential settings. Bold colors red, blue, black are common in garages and gyms.
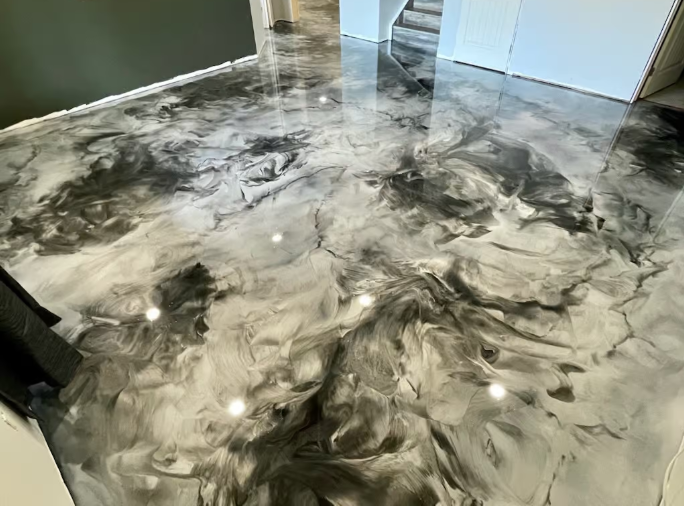
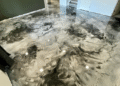
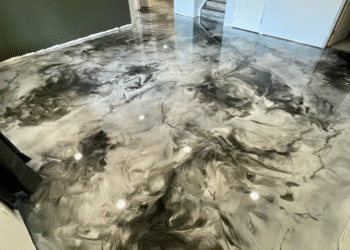
Metallic epoxy creates swirling, three-dimensional effects. No two floors look exactly the same. It’s a statement finish that works well in finished basements and entertainment spaces.
Decorative flake systems are extremely popular. Vinyl flakes in various sizes and color blends are broadcast into the base coat to create a terrazzo-like appearance. They also add texture, which improves slip resistance.
Quartz systems use uniform-size quartz aggregate broadcast into the coating. They create a very consistent appearance with excellent durability.
Keeping It Looking Good Over Time
Regular cleaning is simple. Sweep or dust mop weekly. For deeper cleaning, a damp mop with a pH-neutral cleaner works well. Avoid harsh chemicals — bleach, ammonia-based cleaners, and abrasive scrubbers can damage the topcoat.
Avoid dragging heavy, sharp objects across the floor. Even the toughest coatings can scratch under extreme conditions.
Cost Analysis and Return on Investment
What Does It Actually Cost?
Costs vary based on the coating system, floor size, prep requirements, and location. Here are general ranges for Woodland Park, NJ and the surrounding area:
| System | DIY Cost (per sq ft) | Professional Cost (per sq ft) |
| Acrylic sealer | $0.30–$0.60 | $1.50–$2.50 |
| Water-based epoxy | $0.70–$1.20 | $2.50–$4.00 |
| 100% solid epoxy | $1.50–$2.50 | $4.00–$7.00 |
| Polyaspartic system | N/A (pro only) | $5.00–$10.00 |
| Full hybrid system | N/A | $6.00–$12.00 |
Is Professional Installation Worth It?
For acrylic sealers and basic water-based epoxy, a skilled DIYer can get decent results. But for 100% solid epoxy, polyaspartic, and multi-coat systems, professional installation is strongly recommended.
The equipment matters. Contractors use commercial grinders, shot blasters, and professional-grade rollers that aren’t available at home improvement stores. The difference in surface prep alone justifies the cost.
Long-Term Value
A quality coated basement floor has a return on investment that goes beyond aesthetics. It reduces maintenance costs, prevents moisture damage, and can contribute to a higher home appraisal value.
A cheap coating that fails in three years costs you more than a quality system that lasts fifteen. Think long-term.
Maintenance and Care
How to Keep Your Coating in Top Shape
Your coated floor doesn’t require much. But a little regular attention goes a long way.
Weekly: Sweep or dust mop to remove grit and debris. Grit acts like sandpaper under foot traffic.
Monthly: Damp mop with a pH-neutral cleaner. Don’t let water pool in low spots.
Annually: Inspect the floor closely. Look for signs of wear, especially in high-traffic areas. Catch small issues early before they become big ones.
Signs Your Coating Is Failing
Watch for these warning signs:
- Peeling or delamination — the coating is lifting away from the concrete
- Blistering — moisture trapped beneath the coating is pushing up
- Yellowing — UV exposure or chemical contact is degrading the topcoat
- Hairline cracking — the concrete beneath is moving
If you catch problems early, spot repairs are often possible. If you wait too long, full recoating may be necessary.
How Long Should a Coating Last?
With proper prep and maintenance, here’s what to expect:
- Acrylic sealer: 2–5 years
- Water-based epoxy: 5–10 years
- 100% solid epoxy: 10–15 years
- Polyaspartic system: 15–20+ years
High-traffic areas will show wear faster than low-use areas. A maintenance coat applied every 3–5 years on the topcoat layer can significantly extend total system life.
Health, Safety, and Environmental Considerations
VOC Emissions and Air Quality
Some coatings contain volatile organic compounds (VOCs). These chemicals off-gas during application and curing. In a confined space like a basement, high-VOC products require serious ventilation.
Water-based epoxy and waterborne polyaspartic products have significantly lower VOC content. They’re a better choice for occupied homes, especially where children or pets may be present.
Always read product safety data sheets (SDS) before application. They tell you exactly what ventilation is required and what PPE you need.
Personal Protection
At minimum, wear:
- Chemical-resistant gloves
- Safety glasses or goggles
- Vapor respirator (not just a dust mask)
- Non-slip footwear
If you’re applying solvent-based products, add a full respirator with organic vapor cartridges. Don’t cut corners on PPE.
Eco-Friendly Options
Low-VOC and zero-VOC coatings are increasingly available. Bio-based epoxy resins made from plant-derived materials are entering the market. These options perform comparably to conventional products in most applications.
Disposal matters too. Uncured epoxy is a hazardous material. Follow local regulations in Woodland Park, NJ for disposal of unused coating materials and empty containers.
Special-Use Scenarios and Recommendations
Residential Basements
For finished living spaces, aesthetics and low odor are priorities. Choose water-based epoxy or waterborne polyaspartic. Add a matte or satin topcoat for a refined look.
Home Gyms
Impact resistance and cushioning matter here. Rubber flooring tiles are often layered over a coated concrete base. The coating seals the slab, and the rubber provides the cushioning. For open gym floors, a polyaspartic system with non-slip aggregate is an excellent choice.
Workshops and Garages
Chemical resistance is the top priority. Fully-reacted 100% solid epoxy or a polyaspartic topcoat system handles oil, gasoline, brake fluid, and solvents without absorbing them. Light-colored flake systems also make it easier to see dropped small parts on the floor.
Wet Rooms and Laundry Areas
Waterproofing is critical. Start with a cementitious waterproofing layer or a moisture-tolerant epoxy primer. Add a textured, slip-resistant topcoat. Avoid high-gloss finishes in these areas.
Historic Buildings
Older buildings may have unusual slab compositions or legacy contamination. Have the floor tested before choosing a product. Some heritage-sensitive applications call for reversible or breathable coatings that allow moisture to pass through without building up pressure.
Troubleshooting and Common Mistakes
Why Coatings Fail
Most coating failures come down to a small number of root causes:
- Inadequate surface prep. The surface wasn’t clean, dry, or properly profiled. This is by far the most common cause of failure.
- Moisture issues. Moisture vapor coming up through the slab pushes the coating off from below. Always test before you coat.
- Wrong product for the conditions. Using an indoor-only coating on a floor with active hydrostatic pressure, for example.
- Application in bad conditions. Too cold, too humid, or too hot. All of these affect cure chemistry.
- Insufficient film thickness. Spreading the product too thin to save material. Thin coats wear through quickly.
How to Fix Common Problems
| Problem | Likely Cause | Solution |
| Peeling at edges | Poor adhesion | Grind edges, reapply primer and topcoat |
| Blistering | Moisture vapor | Remove blisters, seal with moisture-tolerant primer |
| Yellowing | UV exposure | Apply UV-stable polyaspartic topcoat |
| Cloudy appearance | Moisture during application | Sand lightly, recoat when conditions are dry |
Practical tip: Don’t try to coat over a failing coating. It rarely works and usually makes the problem worse. Grind back to bare concrete and start over.
Future Trends and Innovations
What’s Coming in Concrete Coating Technology
The industry is moving fast. Here are developments worth watching.
Nano-technology coatings use nano-scale particles to fill concrete pores at a molecular level. Early products show impressive waterproofing and self-cleaning properties.
Self-healing coatings contain microcapsules of healing agents that rupture when a crack forms. The agent fills the crack automatically. Commercial versions are already available for some industrial applications.
Smart coatings with embedded sensors can detect moisture levels and temperature changes beneath the coating. These are expensive today but may become standard in commercial applications within a decade.
Bio-based resins are replacing petroleum-derived epoxy in some formulations. They offer similar performance with a significantly lower environmental footprint.
Faster cure chemistry continues to improve. Polyaspartic technology is being pushed toward even shorter application windows and higher performance characteristics.
Conclusion
Protecting your basement floor is one of the most practical investments you can make as a homeowner. The right coating prevents moisture damage, extends the life of your slab, and makes the space more usable.
There is no single “best” coating. The right choice depends on your moisture levels, your budget, your performance expectations, and how you use the space. A storage room and a home gym have very different requirements.
What every good installation has in common: thorough surface prep, a properly matched product, correct application conditions, and appropriate maintenance afterward.
If you’re in Woodland Park, NJ or nearby, work with a local contractor who knows the regional climate and soil conditions. Local expertise matters.
For most homeowners who want maximum durability and minimal maintenance, a full professional system anchored in quality basement floor protection solutions delivers the best long-term return.
And if you want the fastest install with the longest lifespan, talk to a professional about durable polyaspartic coating services for concrete floors in your area. The technology has matured significantly. It’s now the coating standard that serious contractors reach for first.


